Back to School Sale Flyer Design with Co
When it comes to launching a back-to-school promotion that actually stands out—on bulletin boards, storefront windows, social feeds, or classroom doors—a well-crafted flyer isn’t just helpful. It’s essential. Back to School Sale Flyer Design with Co refers to professionally designed, ready-to-use templates that balance brand consistency (“Co” standing for company, cohesiveness, or collaborative identity) with seasonal energy. Think bold typography, smart layout hierarchy, and visual cues like colorful pencils, felt pens, and sale tags—all thoughtfully composed against a rich black background. That contrast doesn’t just catch the eye—it signals confidence, clarity, and care.
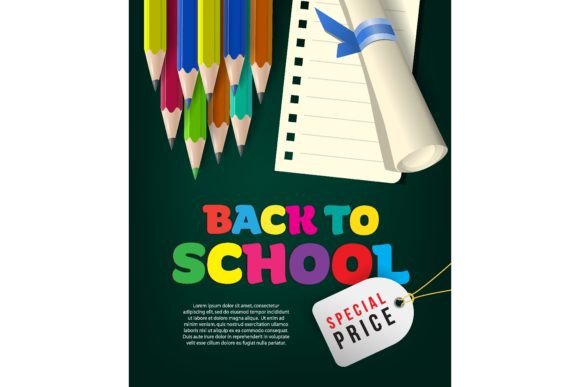
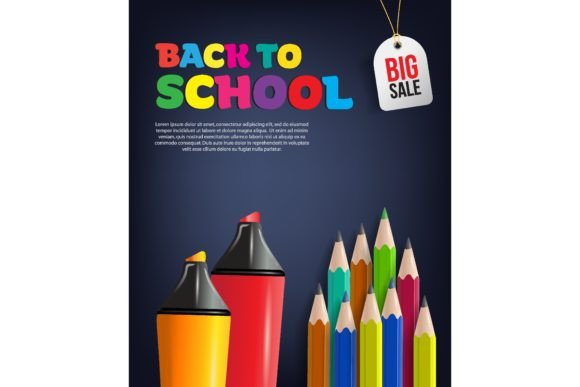
Why “Colorful Pencils, Felt Pens, and Tag on Black Background” Works
A black background isn’t about minimalism alone—it’s strategic. It makes vibrant stationery elements pop: electric blue gel pens, coral erasers, neon highlighters, or hand-drawn tags with playful shadows. This combination communicates both creativity and credibility. Educators notice the attention to detail; parents register professionalism; students feel the energy. But here’s where many go off track: assuming that vivid visuals automatically equal effective communication.
Common Missteps—and What They Cost You
Assuming “colorful” means “cluttered.” Dropping ten different pencil illustrations across a flyer—each with its own shadow, stroke weight, and angle—doesn’t amplify excitement. It fractures focus. Readers spend extra time decoding instead of absorbing your offer: “20% Off All Notebooks” gets lost behind a swirl of unaligned icons. The result? Lower conversion, higher printing waste, and confused messaging across channels.
Overlooking file format and scalability. A beautiful PNG preview looks sharp on screen—but if the downloadable version lacks vector (EPS or SVG) or high-res print-ready PDF options, resizing for a 4’×8’ banner will blur those felt-tip textures or pixelate the tag’s subtle gradient. That undermines trust before anyone reads your headline.
Treating “Co” as an afterthought. Some users drop their logo into a pre-made template without adjusting spacing, color contrast, or font pairing. A navy-blue school logo next to a lime-green pencil icon might clash—not because either is wrong alone, but because they weren’t evaluated *together*. That mismatch quietly weakens brand recognition and feels unintentional.
Skipping real-world testing. Printing one copy on home-office paper reveals what screens hide: Is the white text legible under fluorescent lights? Does the tag’s drop shadow vanish when photocopied for staff handouts? Does the black background absorb too much ink, increasing cost per flyer at scale?
Better Choices—Simple but Significant
Start with purpose—not palette. Ask: Who sees this first? A teacher ordering supplies online? A parent scrolling Instagram while multitasking? A student walking past a café window? Each context demands different emphasis. For digital use, prioritize clear CTAs and mobile-friendly text size. For physical posters, lean into contrast and generous whitespace—even if it means using only three colors total.
Use the black background intentionally—not decoratively. Let it serve structure: frame your headline in negative space, anchor your discount tag at the bottom right (a natural visual endpoint), or create a “stage” where one hero item—like a single oversized pencil with your sale percentage etched along its barrel—takes center stage. Less illustration, more intention.
Verify co-branding compatibility before download. Open the template in your design tool and drop in your actual logo, primary font, and brand hex codes. Adjust the pencil’s accent color to match your secondary palette. Tweak the tag’s border thickness to echo your website buttons. If the file won’t let you edit layers or text boxes easily, look for alternatives—even if it means paying slightly more for layered PSD or editable Canva versions.
Test readability at multiple sizes. Zoom out to 25% in your editor. Can you still identify the core offer? Print a 3×4 inch version and hold it at arm’s length. Is the tag readable? Try converting the flyer to grayscale—if the hierarchy collapses, revisit contrast levels. Real usability isn’t theoretical. It’s measured in seconds and inches.
What to Check Before You Commit
- Licensing clarity: Does the license cover commercial use, unlimited prints, and digital redistribution (e.g., emailing to PTA groups)? Avoid templates labeled “personal use only” if you’re a tutoring business or school supply shop.
- Font inclusion or substitution notes: Free fonts often lack bold weights or international characters. A template using “Comic Neue” may render poorly for bilingual flyers unless the creator provides web-safe fallbacks or embedded type.
- Consistent stroke weights: Compare the outline thickness of the pencil tip, the tag border, and the headline underline. In strong designs, these relate proportionally—e.g., all at 2pt, 4pt, or 8pt—not randomly mixed.
- Smart object organization: Layers named “Background,” “Sale Tag,” “Pencil Group,” and “CTA Button” save hours during edits. Disorganized files lead to accidental deletions or misaligned repositioning.
Final Thought: Design Serves Strategy
A Back to School Sale Flyer Design with Co shouldn’t be judged by how many pencils it displays—but by how quickly and clearly it guides attention to value. The colorful pencils, felt pens, and tag on black background aren’t decoration. They’re visual shorthand: learning tools + urgency + sophistication. When chosen and applied with intention—checking contrast, scalability, branding harmony, and real-world legibility—they become quiet ambassadors for your offer. That’s how a flyer stops being just paper or pixels—and starts building recognition, trust, and response.